Disclaimer: This installation guide is a recommendation only. Please consult your local council and the building code for exact specifications.
Intellectual Property: The Intellectual Property contained in this document and the ShadowDeck™ system is owned by Smarter Products Limited — including all trade marks, patents, designs, copyright and confidential information. This document may only be used in connection with genuine ShadowDeck™ products and services provided by Smarter Products Limited, without altering or removing any trade mark, copyright or other intellectual property.
Planning Your ShadowDeck™
It is important to take some time to plan the layout of your ShadowDeck™. We recommend running the decking boards parallel to the house to highlight the timber and conceal the 3mm gap, but ultimately it's a matter of personal preference.
To work out how many fasteners and the lineal metres of decking boards you require, use the formulae below.
Width × Length = m²
Example: 3m × 4m = 12m²
One box of fasteners will fasten 12 square metres using our 140mm wide Kwila decking.
Linear Metres in One Square Metre
1000 ÷ (board width + 3mm gap) = LM + 10% wastage
1000 ÷ 143 = 7.7 (×1.1)
Total Linear Metres of Decking Required
m² × 7.7 = L
Example: 12m² × 7.7 = 92.4m
Note: You will also need to account for ShadowDeck™ 180x19mm fascia boards around the outside of your decking.
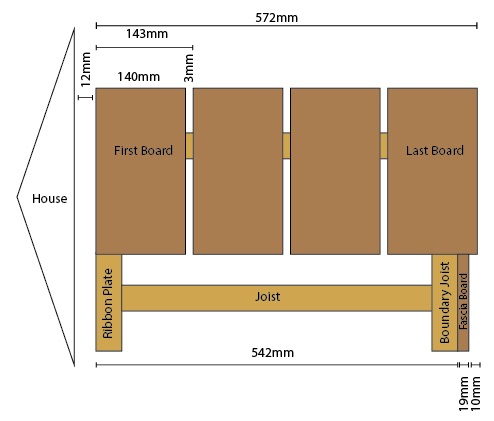
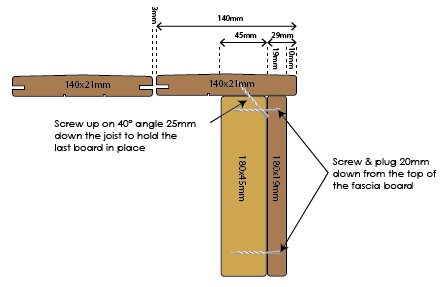
The standard width of the decking boards is 140mm, on top of which you must allow a 3mm gap. Divide the width of the deck by 143mm (140mm board + 3mm gap), adjusting as needed, to ensure you use the full width of the boards from start to finish. This helps avoid having to rip down any boards. Make sure your perimeter joists end 30mm shorter than your last decking board so the fascia board tucks up nicely under the last board with a 10mm overhang.
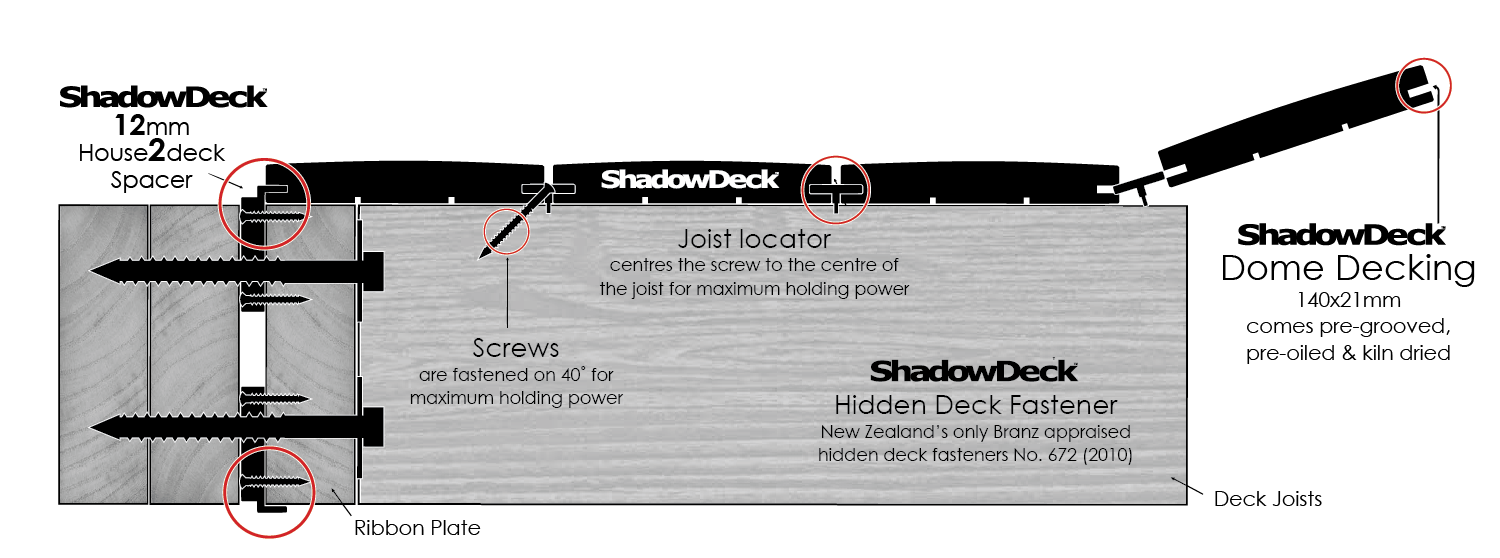
Allow a 12mm space between the house and your first decking board. Using a ShadowDeck™ 12mm House2Deck spacer makes it easy to ensure your first board starts 12mm out from the house.
Example: For a 2m deck out from the house, divide 2000mm by 143mm, which gives roughly 13.98 boards. Round up to 14 boards × 143mm = 2002mm. Add the 12mm house gap for a finished deck width of 2014mm. To find your outside boundary joist measurement, subtract 29–30mm: 2014mm − 30mm = 1985mm, allowing a fascia board with a 10mm overhang.
If your decking boards run parallel to the length of the house, your joists should run perpendicular to the house at 400mm centres. Once boundary joists are in place, evenly space your joists at 400mm centres.
Installing Your First Board
Placeholder text written by Strand Media from product knowledge — Darrel to confirm or replace with the full wording from the WordPress site.
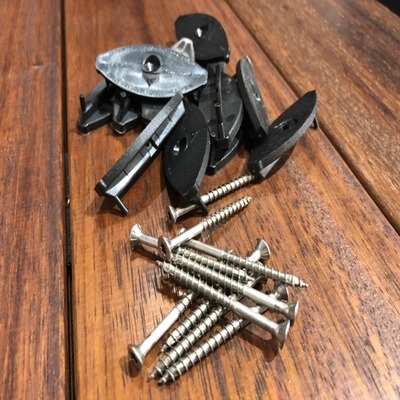
Start at the house side of your deck. Use the 12mm House2Deck spacer to set your first board 12mm off the house, then fix the first board down. Sit the hidden fastener into the groove and screw it to the joist at every joist centre, keeping the board straight as you go.
Installing Decking Boards
Placeholder text written by Strand Media from product knowledge — Darrel to confirm or replace with the full wording from the WordPress site.
Lay the next board against the fixed fasteners and push it home so the fastener seats into the groove, automatically creating the 3mm gap. Add a fastener at each joist, then repeat across the deck. Check your spacing every few boards and adjust if needed so you finish on a full board.
Installing the Final Board
Placeholder text written by Strand Media from product knowledge — Darrel to confirm or replace with the full wording from the WordPress site.
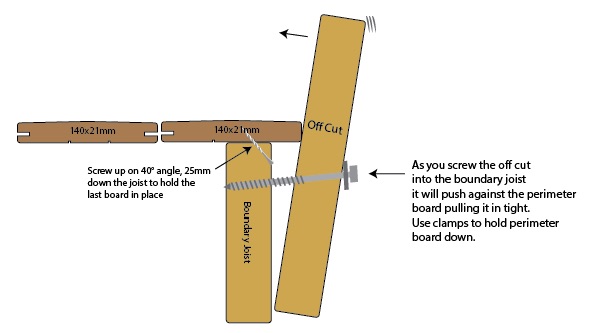
The final board often needs the groove picked up by a T-shaped fastener or screwed and plugged, as you can't always slide a hidden fastener in from the outside edge. Set it to leave room for your fascia board and a 10mm overhang.
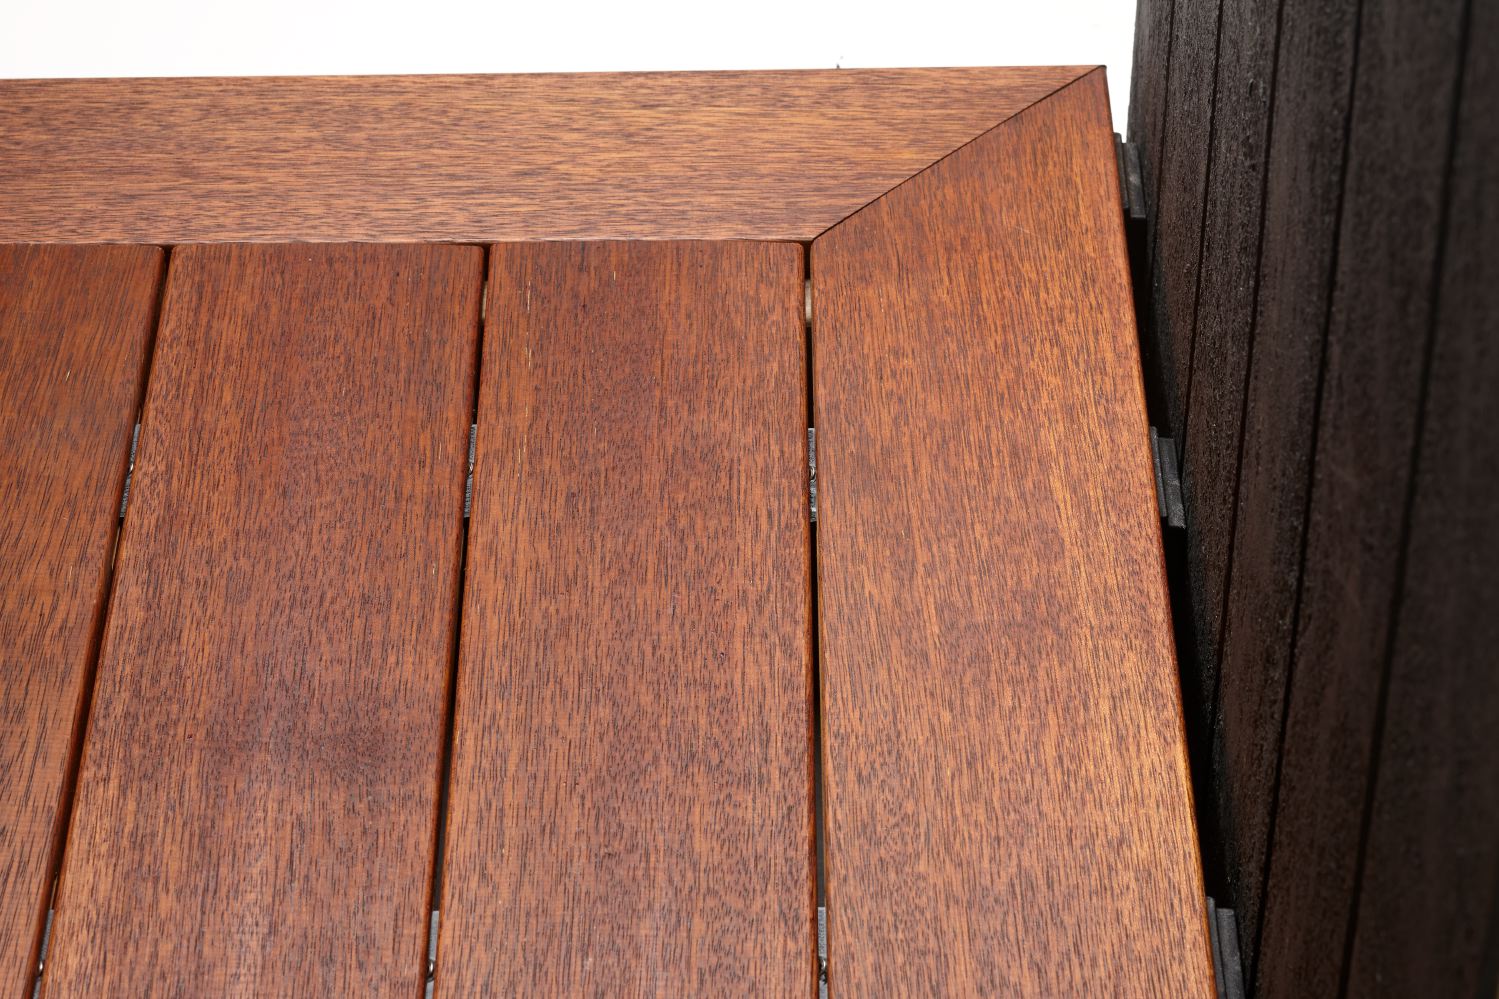
Installing the 180x19mm Fascia Board
Placeholder text written by Strand Media from product knowledge — Darrel to confirm or replace with the full wording from the WordPress site.
Fix the 180x19mm fascia board to the boundary joist so it tucks up under the last decking board, leaving a 10mm overhang for a clean shadow line around the perimeter of the deck.
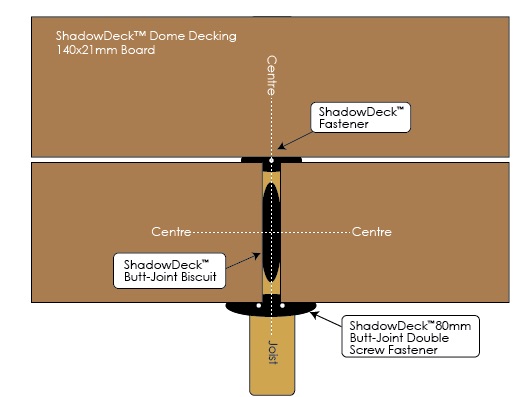
ShadowDeck™ Butt-Joint
Placeholder text written by Strand Media from product knowledge — Darrel to confirm or replace with the full wording from the WordPress site.
Where two boards meet end-to-end along their length, use the 80mm Butt-Joint Double Screw Fastener or 100mm Butt-Joint Biscuit. These pick up the edge of both boards at the joint, keep them level, and add strength.
ShadowDeck™ House to Deck Spacer
Placeholder text written by Strand Media from product knowledge — Darrel to confirm or replace with the full wording from the WordPress site.
The 12mm House2Deck spacer creates a consistent, clean 12mm gap between the house and the deck and picks up the first board, giving a neat start and allowing for drainage and ventilation.
Picture Framing Your ShadowDeck™
Placeholder text written by Strand Media from product knowledge — Darrel to confirm or replace with the full wording from the WordPress site.
Picture framing the perimeter gives a premium, finished look. Use the 1-sided groove Picture Frame profile around the edge; the groove underneath the perimeter edge picks up the fascia board. Mitre the corners for a clean 45-degree join.
Screw & Plug Technique
Placeholder text written by Strand Media from product knowledge — Darrel to confirm or replace with the full wording from the WordPress site.
Where a hidden fastener cannot be used (such as the final board or a tight perimeter), pre-drill, countersink and screw the board down, then glue a matching timber plug into the hole. Sand flush once cured for a near-invisible fixing.
Steps
Placeholder text written by Strand Media from product knowledge — Darrel to confirm or replace with the full wording from the WordPress site.
Build step framing to suit your rise and going, then deck the treads using the same hidden fastener method. A Bull Nose profile on the front edge of each tread gives a comfortable, rounded step edge.
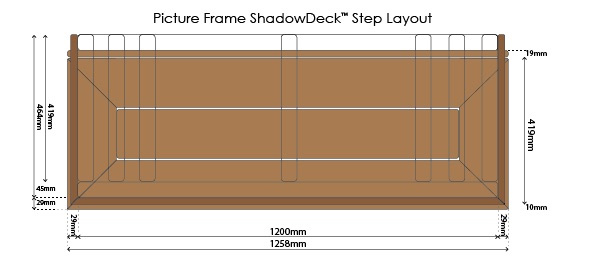
Picture Frame Steps
Placeholder text written by Strand Media from product knowledge — Darrel to confirm or replace with the full wording from the WordPress site.
For a high-end finish, picture frame each step tread so the grain wraps the edges. Combine the Bull Nose front profile with picture-frame sides and mitre the corners.
Using a Bull Nose Profile
Placeholder text written by Strand Media from product knowledge — Darrel to confirm or replace with the full wording from the WordPress site.
The Bull Nose Picture Frame & Step profile has a rounded leading edge, ideal for step treads and any exposed deck edge where a softer, barefoot-friendly finish is wanted.
Deck Maintenance
Placeholder text written by Strand Media from product knowledge — Darrel to confirm or replace with the full wording from the WordPress site.
Kwila is a durable hardwood. Wash the deck periodically with clean water and a stiff broom. New Kwila will leach tannins initially — rinse off as needed. To maintain colour, apply a quality decking oil following the manufacturer's directions; left untreated, Kwila will silver off over time.
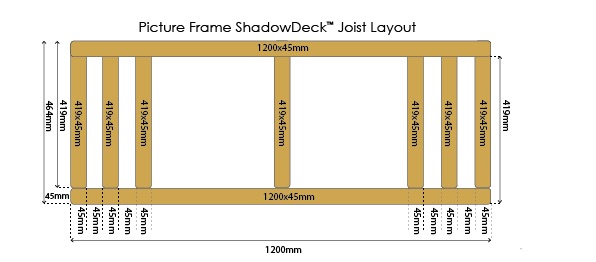
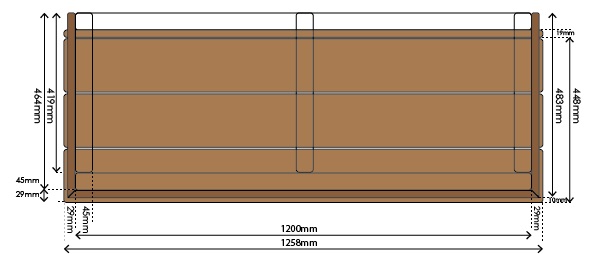
3×2 Picture Frame Deck Layout Example
Placeholder text written by Strand Media from product knowledge — Darrel to confirm or replace with the full wording from the WordPress site.
A worked example of a 3m × 2m picture-framed deck showing joist spacing at 400mm centres, board counts, perimeter picture-frame boards and fascia. Use the planning formulae above to adapt to your own dimensions.